Wednesday, March 14, 2012

How to print any size you want

It didn't even dawn on me that some people might

have a hard time figuring out how to print a 3x3in

picture (or any random size for that matter).

Then I gave away my first pre-made scrapbook and

thought about how they would print all the sizes.


There are two ways I can think to do it...


First (and less affective I think), You could print

a normal 4x6 or 5x7 and just cut down the image.

The pro to that is there is no extra work before

the image is printed. The con is that You might

have to cut out an important part or the picture.


Second (the way I do it), is to go into an image editing

program (I use photoshop, but I'm sure this can easily

be done on any other editing program such as picasa)

and crop the image to the size you want, and then

dragging it onto a white image that is 4x6 or 5x7. So you

just crop, make a new template, and drag on your cropped image.

Make sense?


So if I want a 3x3 for example, I just crop my

image to a 3x3. Then I go to file, "New". and make that

image 4x6, and then drag the 3x3 onto my new template.

It's nice because then you can get them printed anywhere

and get the size you want.


Here's an example of my end result,

two 3x3 images ready to be printed as one 4x6:
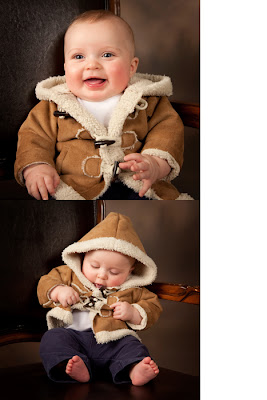


The same principle applies to any size.

If you want a 5x5in, just drag it onto a 5x7

template. If you want two 2.5x3.5in then drag

them both onto one 4x6 etc.

Monday, March 12, 2012

4 Square Template

Right now my very favorite template I've been using is a simple 4 square design. All of these examples are using 8x8 scrapbook paper, but you could easily do it on a 12x12 page as well.
All I do for this one is cut out two 3.5x3.5 squares and place them in diagonally from each other and place an embellishment where their corders connect. Then print 4 3x3 pictures and place them in each designated space.

(If I were making a 12x12 page, I could cut the paper in 5.5x5.5in squares and place 5X5 pictures instead)


What I like about this design:


-It's super cute and always gets a lot of compliments


-It's simple and easy and doesn't require a lot of tools


-It incorporates a lot of pictures on to one page, giving


you great use of space.

Here is a completed example that I used in my Baby Blaine's album:


The following examples are from pre-made


scrapbooks that I gave out as gifts, so they


are still without pictures (but you get the idea)


In this last example, I used a second paper and cut it out a 4X4 square to make a double border.


Wednesday, March 7, 2012

My Style

I don't know if I'm the only one out there who doesn't

like scrapbooks that have 1000 embellishments and fancy

techniques on one 12x12in page and then they only have one

little picture in the middle. You know what I'm talking about?


I like my scrapbooks to be more focused on the images and

journaling sections than on the cutesy paper or decor.

After all, the point of a scrapbook (for me anyway) is

to document your life, an event, etc and not to look at cool

paper. Don't get me wrong, I LOVE cute paper and embellishments,

just not more than I love my little baby or the holiday I'm

trying to make a lasting memory of.


So that's why I've decided that I want my style to always

be about the images. Once you get deep into the passion

of scrapbooking, I'm sure you just want to try out all the

different techniques you learn about and make the cutest

page ever, but I'm gonna try to stick to my guns and not

get into that particular style.

Monday, March 5, 2012

Paper Tear Edger - Deckle

Coolest Tool Ever?


That would be the tear bar


On the last scrapbook I made I'm pretty


sure I used the tear bar on every single page.


I have the


Fiskars Paper Tear Edger Deckle


that I got from Joann Fabrics


I like the deckle because it gives the paper
a really awesome ripped look. I love to use a


few papers and then layer them to make borders


and variety to the page. I think the best word for


it is just plain awesome.


Best part is, it's really easy to use.


I thought I would just end up ripping up all


the paper that I wanted to edge, but it's simple.


You just pull the paper toward the bar and down a little


and it rips easy as pie!


Here are the different ways I use it:


-A Thick single page, so make it look like one kind


of paper is bleeding off onto the next page


-Stacked paper making a page boarder


-Stacked paper making a cool looking edge


-Ripped in a rectangle to use as a picture boarder


In this example, I used the tear bar on the


striped paper and had it on the edge so it


looks like the paper is bleeding onto the left page.


This was done with a single paper, with no layers


and I had the torn paper take up 1/3 of the page
(using the rule of 3rds as an element of design)


In this example, I used the tear bar with


a single piece of paper, but instead of


having it bleed from another page, I just


had it coming down from the top. Again, I had


it take up 1/3 of the page using the rule of 3rds


as an element of design.


Here is an example of stacking two


torn papers to make a cool edge. I


think the layered look is awesome and


really adds a lot of depth and interest.


Here I used 3 papers total to make the boarder.


The top 2 lairs are torn and they are bordered


with a straight edge paper. I love having the


blue paper as a torn accent to give the border


depth and a little color pop.


This is a similar example of a border, but


I only used two papers to create it, and


only used the tear bar on one side.


In this last example, I used the tear bar
as a picture border. I thought it was


appropriate for this christmas spread


because it kinda looks like open wrapping paper.


This is a gives scrapbooks a really fun look
and like I said before, it's the coolest tool :)

Monday, February 27, 2012

Deja Views 8x8 Baby Girl Album Kit

I recently made a pre-made scrapbook for my cousin


for her baby-to-be. I think baby scrapbooks make


awesome gifts!


Anyways, I found the cutest little album kit


from scrapbook.com from Deja Views C-Through


This kit is SUPER affordable and has everything


you need to make a really cute scrapbook (including


the album itself).


I made the entire book using only the materials


from the box (and a few tools that I had).


It turned out amazing and I will definitely


use this kit again in the future.


(just a thought, if you know someone who likes


scrapbooking, this kit would make a great gift


by itself!)


Here are some sample images of the scrapbook


I created using this Album Kit :)


Wednesday, February 15, 2012

Circle Cutter

Another must have tool (in my opinion) is a circle cutter


The one I have is a Fiskars Paper Cutter

You can get one online, or at your favorite scrapbook store.

It's a cool tool because it allows you to slide the blade farther

or closer to the center so you can make a huge variety of

circle sizes. Plus, it's very easy to use.


The top uses I have for it is

-Making journaling sections

-Using it as an embellishment

-Using it as a boarder to an embellishment

-Using it in the background to add more design


Here are some examples below:


This first example is of a journaling section. I used a larger

setting to make the pink striped circle, and then went down

a size to cut out the middle white part.


Here I used the plaid paper on the smallest setting, do


create little circle embellishments to fill empty space on the page.


Here I used it as a boarder for the sticker embellishment.

The sticker itself wasn't large enough to fill the space that

I wanted it to, so I just used the circle as a filler to add design.


This is another space filler scenario. The letters alone would


be bland and boring, so I used two separate circle sizes to make

boarders for the letters and then boarders for the circles.

Then I cut out pink circles to add more background fillers.


For this last one, I just wanted a little something extra on this


page, so I added a circle and had it peaking out from behind a boarder.It gave the page a little more sense of depth.


So there you have it! I'm sure there are a bunch of other

uses that I have yet to try out, but so far this tool has really

enhanced my page design.

Monday, February 6, 2012

Pre Made Scrapbook Gifts

Pre Made Scrapbooks are cool for three reasons.


1st: it's a personalized gift that has a lot of meaning

2nd: It's easy for them to finish and personalize

3rd: It gives me an excuse to scrapbook!


It's really simple, you just design the pages and then

label what size of pictures are meant to go where.

Then, once they print pictures from their event, they

can simply insert the right size pictures and TADA! a cute

scrapbook, all ready to go :)


I got the paper from scrapbook.com

It's the Creative Imaginations Breathless Collection


The embellishments and borders are stuff I picked up